
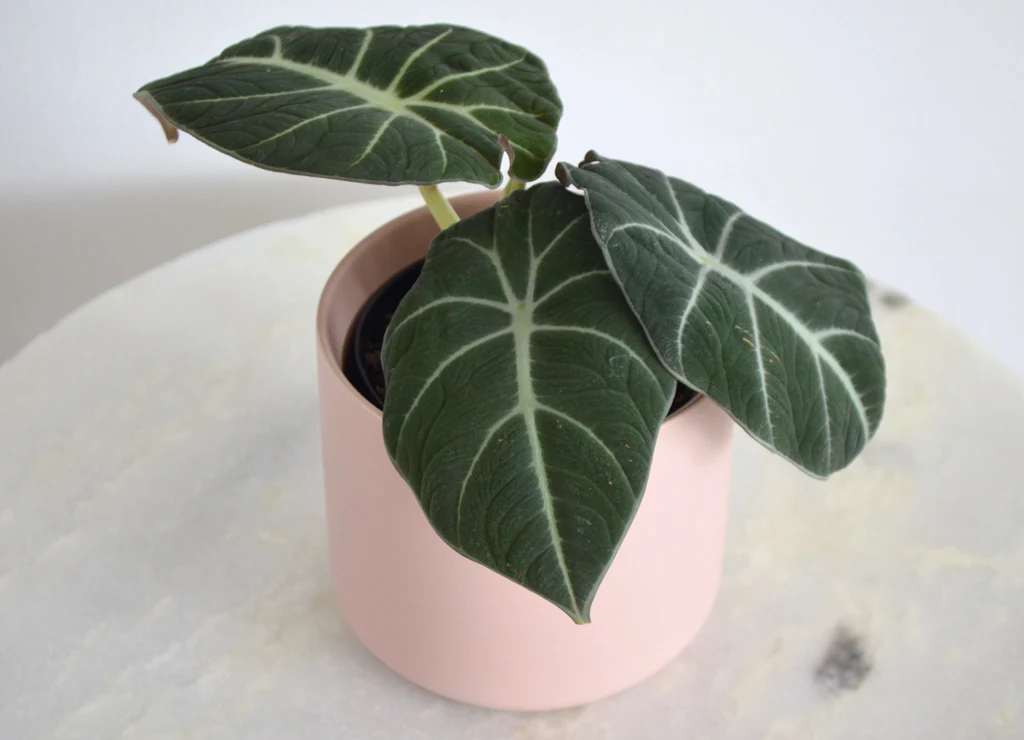
Alocasia Black Velvet, otherwise known as black velvet, is a gorgeous little plant. Black velvet plants are known for their arrow-shaped dark green leaves that are velvety in texture. Hence the name ‘Black Velvet’. The deep green leaves are given contrast with striking silvery-white veins making it quite a little gem of an indoor plant. Here are the most ideal conditions to give your black velvet plant the best care.
Despite its scientific name, Alocasia reginula, which translates to ‘little queen’, black velvet isn’t a particularly difficult plant to take care of. If you do have this little gem in your home, giving it the best care will ensure she looks and feels her best!
[ez-toc]Lighting: Bright And Dappled
As a tropical plant, native to the jungles of Borneo, it comes as no surprise that this plant thrives in bright areas with dappled sunlight. Considering it naturally grows on the jungle floor with dappled light through the canopy of trees, black velvet does best in bright areas with touches of direct sunlight.
Position it near, but not next to, an east or north-facing window where it can get plenty of indirect light. The plant will also be happy sharing a space with larger sun-loving plants. This should be able to mimic black velvet’s natural environment of getting dappled sunlight through a tree canopy.
If you notice that your black velvet is extending itself closer to the window, feel free to position it closer as the plant clearly wants more light. If the leaves curl and crinkle, position it further from a window. This is an indication of too much light.
Watering: Consistently Moist & Humid With Proper Drainage
Black velvet plants love water. They need it to maintain their relatively thick leaves. Regular watering and misting will keep this tropical plant happy. Bonus points if you group black velvet with other humidity-loving plants.
There are some nuances to watering black velvet. You want to ensure that the soil and leaves are moist, but not dripping. If the leaves are overly misted and dripping with moisture, this can increase the chances of root rot.
You want to water black velvet when the top soil is dry. Water the plant until the soil is moist, but not soaked. You can start by giving a small amount of water. Wait and check if any excess water has come out of the drain holes. Once a little water has come out, you’ll know that your black velvet is adequately watered.
Soil: Rich And Loose
Very much like the jungle floors you’d naturally find them growing on, black velvet likes rich soil that isn’t too compact.
A mix of bark, peat, coconut coir and perlite will make your black velvet happy. This mix gives the plants the nutrients it needs. The mix of chunky and fibrous organic matter also ensures that your black velvets roots get plenty of air circulation.

Like with many indoor plants, root rot is an ever looming issue. Keep that soil rich and loose. Well-draining soil and adequate watering are perhaps the only tricky factors to balance with an otherwise fuss-free plant.
Fertilizing: Monthly With A Balanced Mix
As a relatively slow-growing plant, black velvet doesn’t require heavy fertilizing. Fertilizing it once a month, during spring and summer, is enough. Use a balanced liquid plant fertilizer to meet the plant’s nutrient needs.
Signs Your Black Velvet Is Happy
- If your black velvet greets you with flowers, know that you’re giving it the right care. You can trim off the flowers if you want as the flowers will take more energy and nutrients from your black velvet to maintain.
- Dark green leaves are a clear and obvious sign of a healthy and happy black velvet plant. Keep doing what you’re doing!
- Your black velvet will naturally shed its large and older leaves. If new leaf growth follows after shedding, know that this is the natural course of the plant. It is not dying. To keep up with the changes, lessen the amount of water you give in accordance to the new yet smaller leaves. Giving it the same amount of water for smaller leaves will increase the plant’s chance of getting root rot.
Signs Your Black Velvet Needs More Care
- When black velvet leaves elongate or if the stems start extending towards its light source, the plant wants more light.
- Yellowing leaves, small leaves, or leaves that aren’t as deep green as they should be is also an indication that your black velvet needs more light. Place it in a brighter area and give it a boost with some fertilizer. You can also opt to cut out the yellow leaves, to redirect your plants energy to growing healthy dark green ones.
- If all your black velvet turns yellow, leaves and stem, this is a clear indication of root rot. Gently uncover the roots and trim of roots that are mushy and have turned brown or black. Allow the healthy roots to dry out before watering again.
- When black velvet leaves look dry or are beginning to crinkle, address the issue first with more humidity. Watering may not be the issue, especially if the top inch of the plant’s soil is moist. Increase the frequency of misting so that the leaves are moist, but not dripping. For good measure, move your black velvet further away from its light source.
Another culprit to drying leaves is the plant is overexposed to a draft. Remember that black velvet is a tropical plant. Warm and humid is its ideal environment. Position your black velvet to more humid area to revive dry leaves.
- Crispy edges in a black velvet plant is actually an indication of over-fertilizing. Trim the edges and immediately stop any fertilizing routine. Flush the excess fertilizer out by watering with distilled water for about a month.
- Spider Mites are a common infestation for under-misted black velvet plants. If you see small white webs under the leaves, wipe it down with a damp cloth and spray with neem oil.
Black Velvet plant is a beautiful addition to any home. With a good soil mix, black velvet is easy to take care of when you get the watering and misting correct.


