
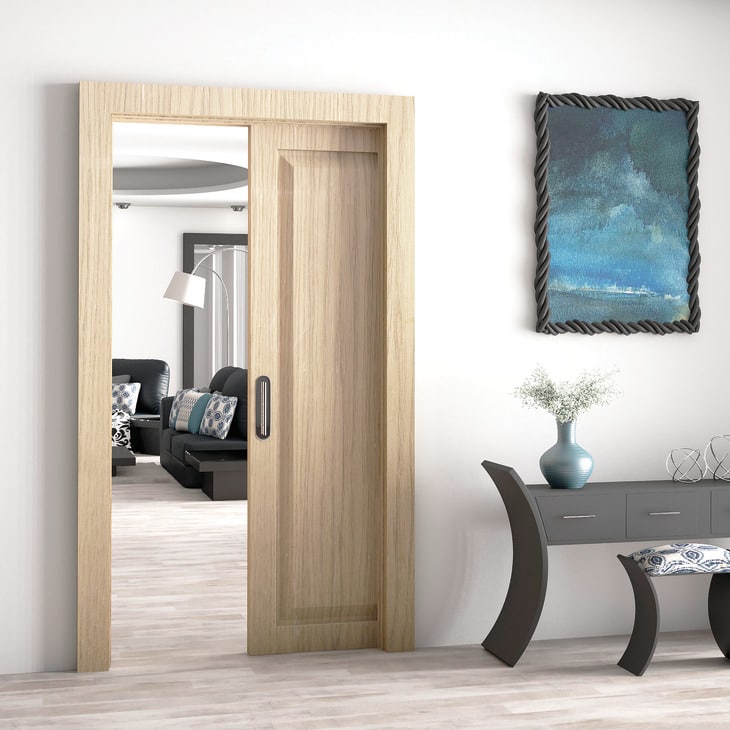
What is a Pocket Door?
Pocket doors are a space-saving alternative to traditional doors that swing open. Instead of being mounted on a hinge where it’s sliding out at an angle to open and close, pocket doors are mounted on a track and open and close, disappearing through a wall pocket. The resulting aesthetic lends a clean, seamless, and open look.
Pocket Door Pros
Pocket doors are a great space-saving option without compromising the function of a door. They are an excellent alternative to adding a doorway in narrow halls, small bathrooms, storage rooms, and laundry rooms. Because they don’t swing outward, the space allocated for a swinging door can be used to accommodate something else, such as a table, a mirror, a plant etc. To help put this into perspective, you save up to 10 square feet of space using a pocket door over a swinging one.
Pocket Door Cons
The tracking mechanism a pocket door runs out can be hard to repair or replace. Although considered a minor repair, it can prove to be a headache. You can avoid such a nuisance by getting a professional to install the highest quality track and carriers.
If sound privacy between two areas is a priority for you, the thin build of pocket doors will allow sound to go through it. For instance, this can be an issue in a home office where you may want quiet on top of a clear division between your office and the room next door.
Because pocket doors save accessible space, the door itself still takes up space as it needs to be able to go through a wall. That makes it not feasible for all areas in your home where the walls are thin and can’t carry a pocket door or if the wall is a load-bearing wall and can’t/shouldnot be hollowed to accommodate a pocket door. This also applies to walls that accommodate plumbing, electrical wiring, or mounts for shelves.
Lastly, pocket doors do take up accessible space if you decide to leave a handle on the end. The handle obviously can’t go inside the pocket or sleeve of the wall. This means that a portion of your pocket door will always take up some space in the doorway.
How To Install A Pocket Door?
If you opt to go the DIY route and install a pocket door, go through the following steps to get an idea of what kind of DIY job this entails.
What you’ll need:
- Pocket door frame
- Door
- Door lock
- Door handle (optional)
- Drill
- Level
- Miter saw
- Oscillating tool
1.Find A Feasible Wall
Before you begin construction, know what kind of wall you’re building on and if it’s feasible. Your chosen wall might be a load-bearing wall where you’ll have to compensate for the support you’ll be removing to accommodate a pocket door.
Another consideration is things like pipes and electrical wiring behind your drywall that may not allow enough space for you to build altogether.
You need to check that you have enough space and support to accomodate a pocket door without compromising what’s already built into the wall. For a typical pocket door size of 32 inches, give your wall 66 inches of door space and at least 4 inches in thickness to accommodate a 2-inch thick pocket door.
2. Buy An Installation Kit
Once you have a feasible wall to work with, purchase a pocket door installation kit, an installation kit takes care of all the nuances of parts needed to install a pocket door, and it comes with detailed instructions to make the DIY job as straightforward as possible. Familiarize yourself with the kit’s components.
3. Prepare Your Door
Make any aesthetic modifications to your door before installing it. Often this is a coat of paint to match the doorway you’ll be installing it in.
4. Measure The Wall And Doorway
Measure your doorway and the adjacent wall by your pocket door. The pocket door should be able to slide open and close without going past the measurements of the doorway and wall.
5. Remove The Molding
Cut through the doorways, moldings, and frame to make space. Be careful not to damage the moldings as these can be reused.
6. Measure And Cut Out The Wall
Using a level, trace a line in accordance to your pocket door as this will guide you where to cut out the space for it. Once this is established, cut out the wall with an oscillating tool and set it aside.
7. Add The Brackets
Measuring out your 2x4s, add them to the lining of the structure. Secure them down using a drill.
8. Install The Door Frame
Assemble your pocket door frame and install it. Start by attaching the head to the frame. Make sure that the frame is level before screwing it into the structure.

9. Install The Door
Center and screw down the bumper and the fastening latch on your door. After, add the wheels on the rails. Once these are in place, line up the door with the screws from the latches on the wheels, then connect it and secure it into place.
10. Add The Guides
After your door is secured, add the guides that will slide through and ensure they’re centered before testing out the door. It should glide open and close smoothly.
11. Close The Wall
When you’re satisfied with the fluidity of the door, add back the wall and secure it with short drywall screws to avoid damaging it. To hide the screws, plug them using a joint compound. Sand it down between layers until the screw holes are no longer visible. Once you have an even finish, add back the right-handed section of the door frame.
12. Add The Door Lock And Handle
Measure and mark where your door lock is, and if you have it, your door handle will be placed. Insert and install the lock and handle according to its instructions. On the right-handed section of the door frame, mark the space needed to accommodate the door lock. Create the room and install the second part of the lock.
Installing a pocket door may not be beginner friendly for DIYers, but with the right tools and preparation, it’s a very doable job with gorgeous results.
Pocket Door Troubleshooting
In the inevitable wear and tear of opening and closing your pocket door, it pays to know how to fix pocket door scratching, how to adjust a pocket door, and for scratches coming from hardware issues, how to remove a pocket door.
To fix a pocket door from scratching, inspect your door to find the source of resistance that’s causing the scratching. Typically, the door is dirty and a thorough wipe down with a microfiber cloth is enough to get it running smoothly again. Be sure to wipe down all the nooks and crannies, especially the door tracks and the wheels which is where a lot of debris can get caught and build up. For more stubborn dirt, you can use mild soap and a damp cloth to break down build up, and then finish off by greasing the wheels.
You’ll need to know how to adjust a pocket door if the cause for scratching is due to misalignment. Whether the door was poorly aligned with the tracks, or if it got misaligned with time, you’ll need to recenter all the components that hold it down.
If your pocket door is still scratching, you will need to know how to remove a pocket door as this is likely to be a hardware issue in which you’ll need to replace parts instead of adjust them. Whether it’s an issue with the trolley, the trim, the track, or another component, remove your pocket door by closing the door and lifting it off by tilting up the bottom of the door. Once the door is removed, you’ll be able to better examine what hardware issues are causing problems.
Install pocket doors into your home with the best materials to prolong any issues that may arise as time passes. Quality trims, trolleys, tracks, and a high-quality installation job is well worth the effort and money to keep such a frequently used piece working in good condition.


