
Regular inspection, maintenance and cleaning are some of pivotal steps to follow before you dive into “how to refinish a deck”.
Decks are structures typically made of wood, steel beams and plastic. Regardless of how well made decks are, they aren’t immune to the wear and tear of being outdoors. Sun, wind, rain and the inevitable wearing down over time will leave decks in need for some much-needed refinishing.
This article will cover how you can care for your deck, to prolong any call for more laborious refinishing. This article will also take you through how to refinish a deck when the time eventually comes.
[ez-toc]How To Clean A Wooden Deck
Regular deck maintenance and cleaning helps to keep the build-up of dirt and grime at a minimum. This especially goes for the dirt that can get trapped in wooden grooves. Mold and mildew due to rainfall also need to be addressed to keep overgrowth at bay.
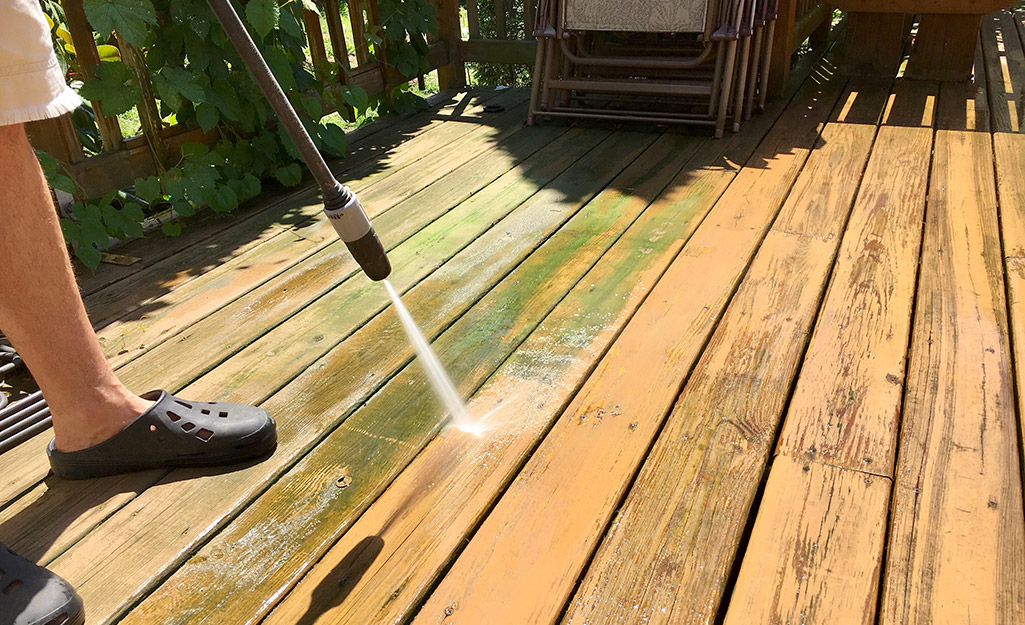
To clean your wooden deck, wet it thoroughly before scrubbing it down with a cleaning solution. Allow the cleaning solution to sit for up to 15 minutes before rinsing the deck thoroughly with a hose.
Wooden decks can be scrubbed down with either a deck mop and/or a deck brush. A deck mop is great to use for regular cleaning and a deck brush can be used occasionally or when you start to notice dirt build up on your deck.
For decks that are made of wood or composite wood (a mix of wood fibers and plastic), a solution of water and ammonia free dish-soap works great. You can add oxygen bleach to your cleaning solution to kill off any mold and mildew present. Make sure to use oxygen bleach and not chlorine bleach. Oxygen bleach will maintain the integrity of deck material. Using chlorine bleach can damage the finish and discolor wood.
Good old white vinegar and baking soda are safe to use as well on wooden or composite decks.
If you have one, a pressure washer can be used as well to clean a deck. Use it on the lowest setting and keep the nozzle at least half a foot away from the deck. This should ensure that your deck gets cleaned without getting damaged.
Maintenance Checks
After you’ve cleaned your deck, allow it to dry thoroughly. This can take days depending on the weather in your area. When your deck has been dried and cleaned, it’s the perfect time to spot any issues. Checking regularly for problems as they begin saves you from dealing with bigger issues.
Look out for rusty nails, cracks in the wood, rotting material, unlodged nails, loose boards, loose rails etc. Essentially, anything that shows the beginning of your deck wearing down is best addressed as soon as it starts. Remove and replace what needs to be fixed. These small maintenance checks are well worth the effort as it will save you money and stress.
How to Refinish A Deck?
Regular deck maintenance has two benefits. It keeps your deck clean and primes it for refinishing. If you regularly clean your deck, a large chunk of the work in refinishing has already been done.
If you’ve just cleaned your deck, there are no issues with it, and it’s completely dry, it’s ready to be refinished.
Sand the Deck
First, you’ll need to sand down your deck. This will have to be done manually with sanding blocks. Using a power sander can go deeper into your deck than you intend. This can sand the wood instead of just the surface.
The purpose of sanding your deck is to create a smooth even surface for when you refinish it. It will allow sealants and other layers such as wood brightener to stick to the deck properly.
Apply Wood Brightener
Next, apply a wood brightener. A wood brightener is an extra and optional step, but we recommend doing it. Since you’re in the process of refinishing your deck, you may as well add wood brightener. A wood brightener makes the most out of the beauty of your wooden deck. Using a wood brightener also helps restore the look of sun-faded wood and helps wood stain stick better.
To prepare wood brightener, follow the package directions. Pour it into a paint pan and use a roller or a brush to apply it all over your deck. If you have one, you can pour the wood brightener into a garden sprayer. The trick is to cover your entire deck evenly, handrails and all. Make sure you apply an even layer as any irregularities will show. You should notice your wood brightening right away, but give the wood brightener a few days to completely dry before proceeding to the next step.
Apply the Sealant
Once the wood brightener is dry, the last step is to apply the sealer. Many deck sealers double as a stain. This gives your deck that final top layer of protection while also giving wood a color touch up.
As your wood brightener is drying, you can go out and purchase your sealer if you don’t have one already. This gives you time to decide on the color you want. Sealers come in various colors. You can choose a more transparent coat if you want to retain the current look of your deck. Alternatively, you can choose a more pigmented sealant to breathe new life into otherwise faded looking wood.
To prepare the sealant, follow the package directions. You can apply sealant the same way as you did with a wood brightener. Apply it with a garden sprayer or pour it into a paint pan and roll or brush on the sealant. Whether oil or water-based, give your sealant a day to dry but keep in mind that will take approximately 2 weeks for it to fully cure. If you need to add another layer of sealant, allow the first layer to dry completely before adding more layers.
Wrapping Up
Refinishing a wooden deck is a tedious job yet essential for home improvement. Keep the labor at the minimum with regular cleaning and maintenance checks. Smaller problems are easier, faster and cheaper to fix. Avoid waiting for any serious issues to come up as a poorly maintained deck doesn’t just compromise the structure, but also increases the chance for accidents. Keep your deck clean and intact so you can enjoy it for many years to come.
Related posts:
 Deck Remodel: Your Complete 2024 Guide to Transforming Your Outdoor Space into a Paradise
 Revamp Your Outdoor Oasis With Our Deck Remodeling Guide
 Deck Stain: Your Guide to a Perfect Deck in 2024
 Deck Remodel Cost: How Much Do You Need to Shell Out in 2024?
 Deck Remodeling Pros and Cons: An Insightful Guide in 2024