
Fall is just around the corner, and a lot people are looking for how to insulate an attic. Here’s everything you must know about it, from costs, basic DIY installation procedures to things to keep in mind.
Duration of procedure: 3 to 5 working days
Total cost of procedure: $2000 to $2500
Why is Attic Insulation Important?
The cold weather is approaching, and keeping our homes warm and comfortable has never been more important. Since heat or warm air tends to rise upwards, insulating your attic is the most logical decision.
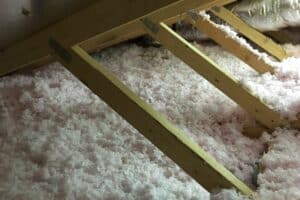
You can insulate your attic in two ways – by blowing in loose-fill cellulose insulation or by installing fiberglass batts between ceiling joists.
Things to Remember Before Insulating The Attic
Before you start insulation for the attic, perform an energy audit for your home as recommended by the U.S. Department of Energy. You can carry out this procedure on your own or through trained contractors.
Energy Audit by Professionals
A professional energy audit costs $400 to $500. It includes an infrared camera scan, visual scans by qualified technicians, thermometer checks of surface and ambient air, a furnace efficiency meter check, and a blower door test.
DIY Energy Audit
You can also opt for a self energy audit instead of calling in professionals. First and foremost, check if the attic door has insulation on the top side. Secondly check for weatherstripping near the access door. You are looking for expanded foam around pipes, and ducts, or caulking in this area.
What is the Best Time for Attic Insulation?
The best time for attic insulation is before the onset of winter. Since the attic can get extremely hot during the summer, attic insulation during this time or year also makes the process easier.
Fiberglass Batts or Rolls vs. Blown-In Insulation
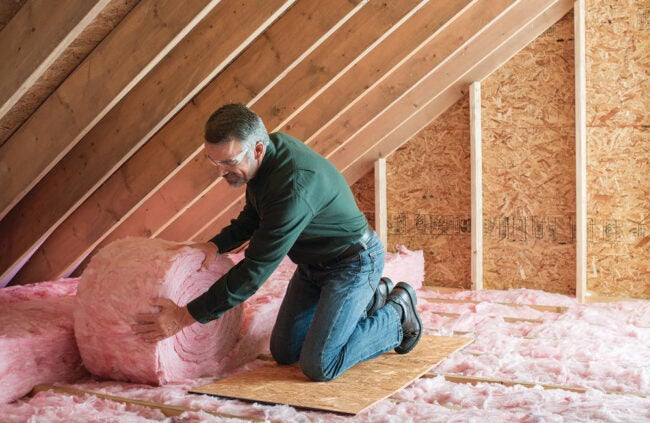
If you’re thinking how to insulate an attic, there are two ways to do so – fiberglass batts/rolls or blown-in insulation. Most DIYers opt for installing fiberglass batts/rolls. However, it is best to know about both and their pros and cons.
Fiberglass Batts/Rolls
This is a budget-friendly option and a lot easier than its counterpart, blowing in loose-fill cellulose. This makes fiberglass batts or rolls a favorite for most DIYers.
In this method, fiberglass batts (strips) or rolls are placed between the joists of the attic. This can be then double insulated with an additional layer or batts placed perpendicularly.
Pros & Cons of Fiberglass Batts/Rolls
| Pros | Cons |
| Machine rental not needed | Batts/rolls must be physically hauled |
| Cost effective | Difficult to work around obstructions |
| Easy to replace/remove whenever needed |
Safety Considerations
Fiber from fiberglass, vermin droppings, dust and other airborne hazards can be harmful for health. It is advised to wear breathing protection throughout the process.
Similarly, sharp edges and nails can be a hazard while working with fiberglass. Hence, it is important to wear protective gear.
Blown-In Insulation
In this mode of insulation, a blower on the ground forces out the cellulose insulation through a hose to the attic. The hose can be directed in all areas of the attic, just like blowing water.
Pros & Cons of Blown-In Insulation
| Pros | Cons |
| Fills in all areas of the attic | Blower machine needs to be rented |
| Easy to work around remote areas/obstructions | Depth of insulation is difficult to judge |
| Loosely filled insulation compacts over time |
Safety Considerations
Using and controlling a hose with insulating material being blown at high pressures is not an easy task. It is best to keep pressure levels at the lowest possible or to ask for professional help.
How To Insulate an Attic with Fiberglass Batts/Rolls
Here’s how you can opt for attic insulation with fiberglass batts/rolls yourself:

Materials Needed
- Protective gear and suit
- Utility knives
- Caulking gun
- R-19 paper-faced fiberglass insulation
- R-19 unfaced fiberglass insulation (for optional second layer)
- Attic vent chutes
Steps to Insulate an Attic with Fiberglass Batts/Rolls
Access the Attic
Access your attic using a ladder. Ensure to wear all protective gear during all times of the procedure.
Seal All Cracks and Gaps
Check areas around vents, chimney, and piping. Using a caulking gun, seal all cracks, gaps, etc. For bigger cracks use expanding foam insulation.
Check for Heat Producing Items
Recessed lights usually protrude through the ceiling. Ensure they are IC-rated (Insulation Contact) or have baffles around them that prevents the insulating material from touching the lights. It is essential that the insulation material is at least 3 inches away from the lights.
Install Attic Vent Chutes
Next, install foam attic vent chutes between the region where the roof and the attic joists meet. This is essential to keep the attic’s passive ventilation free of insulating material.
Measure Accurately
Using a tape, measure all joists side-to side. Make any adjustments to the sizes as necessary.
Install the Fiberglass Rolls/Batts
If you are looking to heat your home, make sure the paper side of the fiberglass roll or batts are facing downwards. However, if you want to cool your home, the paper side should be facing upwards. Keeping your requirements in mind, place the rolls/batts in place.
Add Additional Layer
Once you are done with the first layer of insulation, add another layer of rolls/batts perpendicular for added effectiveness.
Wrapping Up
Your search for how to insulate an attic ends with this blog. From costs, materials, and procedure, here’s everything you must know. Ensure to go through each pointer before you start with your home improvement project.


