
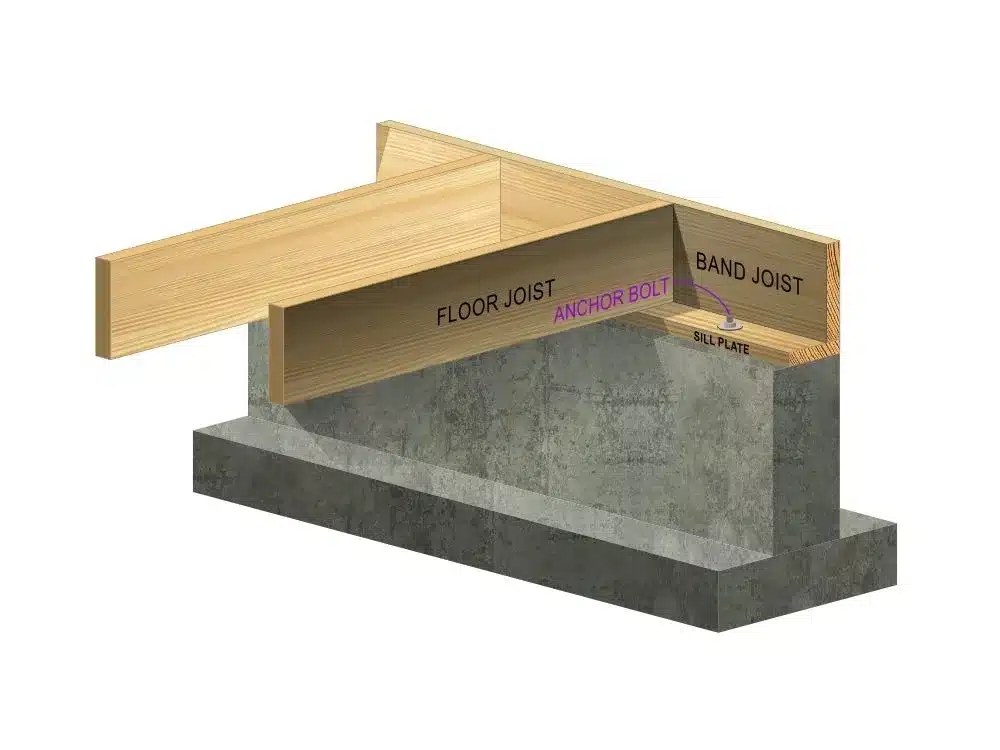
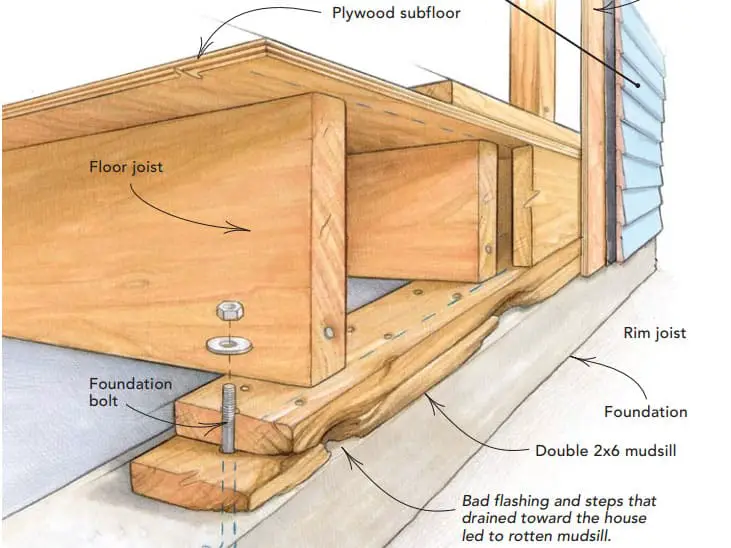
A sill plate, also known as mudsill, is the first piece of wood that essentially anchors the house to the foundation. In fact, you can call it the most important element in your house’s structural framing.
The sill plate is a board anchored horizontally to the concrete base of a house or building. The vertical framing elements, which are called studs, are then erected on top of the mudsill.
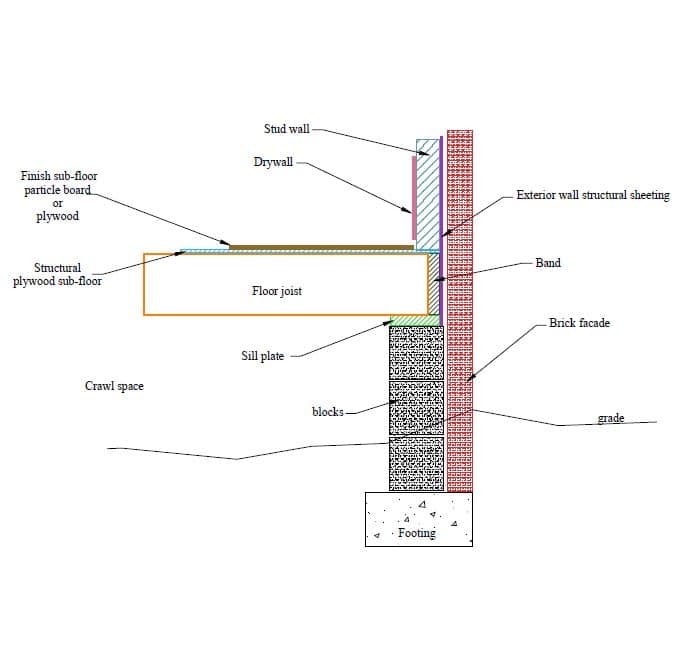
The sill plate is visible from the interiors of your house if you observe it along the top of the masonry walls in the basement. They cannot be seen on the outside as wall sheathing and siding conceal them.
On average, a sill plate is 2×6 or longer. The best material for a sill is treated lumber.
Even the most premium quality wood is porous, so it is vital to treat it to prevent the growth of mildew or mold, thereby ensuring greater longevity of your home’s foundation. This also saves you from frequent repairs.
Why Do You Need a Sill Plate or Mudsill?
The main purpose of sill plates is to keep a building upright. The board creates a flat surface on which the base of the structural frame is placed. The sill plate ensures that the height of each stud constructed over it is uniform.
For instance, installing the framing elements on concrete alone might result in unequal heights of the stud tops. This is because concrete is usually uneven.
You should not skip the sill plate while erecting a new structure or replacing a new one. The plate is tightly bolted to the concrete base to provide a sturdy layer beneath the pillars and walls of the building. It also acts as a strong buffer between the framing of the structure and the foundation.
How to Install a Sill Plate or Mudsill?
 If you’re a DIY enthusiast, you might want to acquire all the technical know-how required to work on your structural framing. However, installing sill plates does not qualify as a DIY project. It’s a pretty heavy-duty job that requires constant professional supervision. But you are welcome to observe and learn.
Below are a few easy steps to follow for the installation of a mudsill:
- Your plate should be the size of the building’s framing. For instance, if the framing is 2×6, your sill plate should be of the exact dimension. Measure the length and width of the frame and cut the boards accordingly using a circular saw.
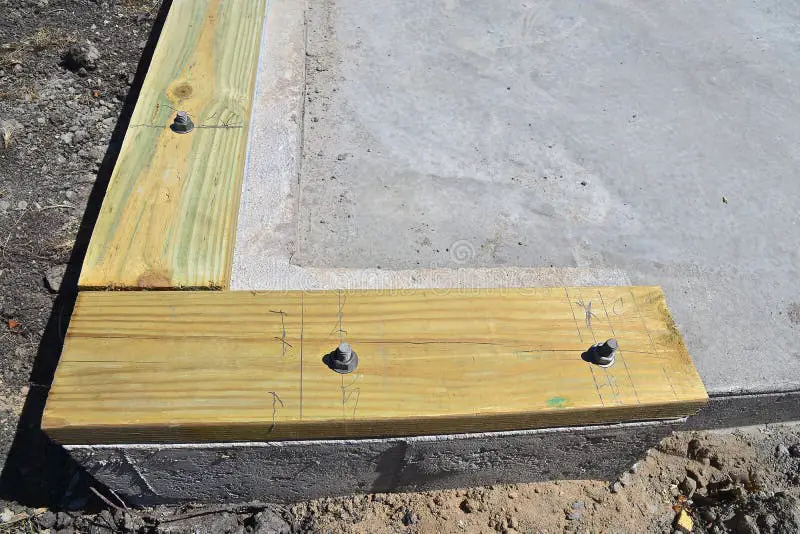
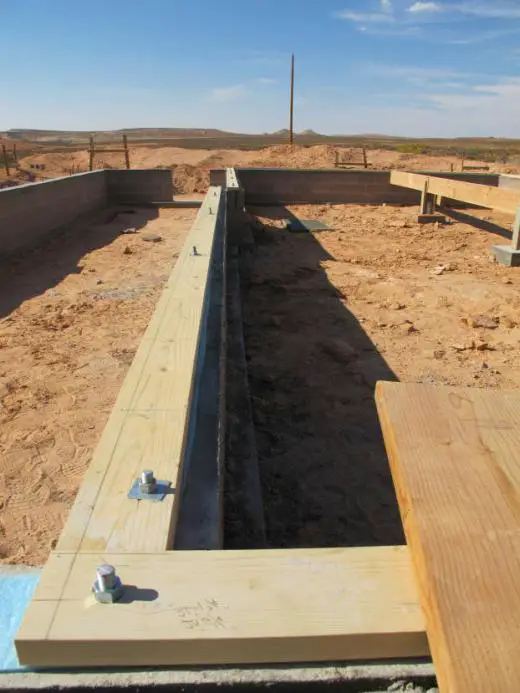
- Set steel anchor bolts, known as J-bolts, into the wet concrete on top of the foundation wall. The hooked ends of these bolts help seal them into the concrete after it cures. The top of the J-bolts protrudes above the concrete which allows the wood sill plates to rest atop.
- Trace the top of the bolts beneath the board using a marker.
- Drill a hole through the plate at each bolt location. You can keep the holes wider as it’ll make it easier to fit in the board.
- Lay down a seam sealer to provide insulation and further strengthen the board. It’s a strip of foam that is cut to fit and pressed down over the bolts. It’ll cost you around $4-$5 for a 50’ roll and is available in paint shops or hardware stores.
- Now, place the sill plate over the bolts. The bolts should be at least 2½” exposed above the block so that they stick up beyond the sill plate. However, if your boards get warped, you’ll have to weigh down the board on either side of the bolt. To prevent warping, cover the boards with a tarpaulin while they are out in the sun.
- Thread the bolts into the holes using large washers and nuts.
- If you still can’t get the nut on, gouge around the bolt into the board using a flathead screwdriver.
- Tighten the nuts over the board so that it’s hard to screw down any further. However, be careful not to over-tighten as treated wood is wet.
In the older days, the sill plate was placed directly over the concrete. In newer structures, carpenters separate the wood sill from the concrete with some kind of gasket material to better resist mold and rot. Homes that are prone to termite problems are often protected with a metal barrier installed under the sill plate. This stops insects from climbing up the foundation wall and reaching the sill and other wood parts.
How to Replace a Sill Plate?
If you notice sagging windows, cracked bricks, or misaligned siding, chances are that your structure is rotting. To be certain, hire a structural engineer to get to the root of the problem. It is also recommended that you get your mudsill checked every few years by a local home inspector to ensure that moisture or insects haven’t eroded this critical element of your home.
Now, if you find out that the plate is actually starting to rot, the need of the hour is to get it replaced immediately. But what would you do that? Engineers usually suggest three ways to handle the situation.
- Using a hydraulic jack to hoist up your home to remove and replace the rotted wood
- Building a stud wall to alleviate further damage and fortify the affected area
- A combination of these two approaches is necessary if there has been extensive damage
Notably, these processes are time-consuming. They may take hours, if not days, to complete, which implies that you might have to vacate parts of your home or even find temporary lodging nearby.
 Speaking of the process itself, here are the necessary steps to follow while replacing a mudsill:
- When or if you decide to use a hydraulic jack, you should know it’ll take days to finish the project. Professionals generally lift an eighth of an inch every few hours for several days. They top the jack only when the rotten wood is safely accessible. Sometimes, you might need a second or a third jack to securely lift the rim joist.
- Once the foundation is safely hoisted, a carpenter can get rid of the rotten wood and replace it with a new beam.
- In case the damage is severe, the engineer might suggest the addition of a stud wall.
- Replacing sill plates can sometimes shake your home’s foundation, resulting in compromised flooring or vertical studs. In such cases, you’ll need to make necessary repairs to all the affected parts.
- Once all the fixes and repairs have been made, the contractor will ideally ventilate the crawl space. Consider investing in a system that can mechanically regulate air flow beneath your feet to keep things dry.
Can You Replace a Section of Sill Plate?
Yes, it is very much possible to replace a small section of a sill plate. The only difference is that you’ll need to redesign the sill so that it meets the current code and fits into empty space left by the section that’s removed. Ideally, it’s not a task that you can handle all alone as it requires heavy-duty equipment. So, it’s better to get the help of a certified and insured contractor.
How Much Does it Cost to Replace a Sill Plate?
Replacing a rotten sill plate or rim joist can burn a hole in your pocket and you need to be prepared for it. If your sill plate is truly damaged, you can’t delay the process of repair as it’s the most vital element that holds your home together. The average cost for a rim joist replacement can be somewhere between $10 and $70 per sq. ft. A complete repair job, on the other hand, will run from $1,000 to $10,000, depending on the severity of the damage and area of the building.
Final Thoughts
While it’s no less than a Herculean task to fix a rotten sill plate, it can be done if you have the proper assistance and the right set of equipment. This is a job that requires a whole lot of effort and patience. You also need a keep an eye on your budget while taking up a sill plate installation project. We hope our guide was detailed enough to give you a fair idea of how to deal with a rotten sill plate situation for your home improvement.
For a complete overview of the installation of sill plates check out the video here :

