Laminate flooring has opened up a world of beautiful yet affordable flooring options for homeowners. With the hyper-realistic look of natural stone, marble, and wood, laminate flooring was designed to mimic their natural counterparts with the bonus of ease of installation.
Where can I install Laminate Flooring?
You can install laminate floor in every room in your home, including kitchen floor.
Your laminate flooring will only be as good as the subfloor it’s laid on. Laminate flooring needs a clean, smooth, and even subfloor or underlayment to adhere successfully and seamlessly. As with any flooring material, you must make the necessary preparations to ensure that installation goes smoothly for a well-made floor.
You can install laminate flooring on most subfloors ranging from wood, ceramic, terrazzo, and exterior grade plywood. The idea is to prepare the subfloor to make it easy for the laminate floor to stick to. Think of it like velcro with the subfloor as the hook (the rough side) and the bottom panel of the laminate floor as the loop (the soft side). The loop won’t entirely stick to the hook if there are obstacles like lint; the same goes for a poorly prepared subfloor.
How To Install Laminate Flooring On Concrete?
When installing laminate flooring on a concrete subfloor, the main concern here is the porous nature of concrete, making it prone to moisture. Setting up the underlayment is essential for successfully installing laminate flooring on concrete.
Your concrete floor needs to be fully set and hardened, which is a 30-day process if you’ve just laid down fresh concrete. Do not install underlayment and laminate flooring on freshly poured concrete.
Once you have cleaned, leveled, dry (use a moisture meter with a reading of 4.5% or less of humidity), and hardened concrete, you need to put the suitable underlayment to compensate for the porous nature of concrete. You can work with a foam barrier paired with a vapor barrier, cork, or a vinyl-backed underlayment.
Only when you have the proper underlayment to protect your floors from moisture can you proceed to install laminate flooring as you normally would.
Is Laminate Flooring Affected By Climate?
Laminate flooring is sturdy but isn’t exempt from warping from climate change. Changing temperature levels and humidity levels make laminate flooring more pliable. The high temperature, for instance, will cause the flooring to expand, hence the need to give an expansion gap during installation. Lower temperatures, however, will cause the floorboards to become more compact.
If moisture can go through the top layer of the laminate floorboards and into the inner layers, the panels will swell and curl up in time.
Can You Use A Steam Mop On Laminate Floors?
Although highly durable, laminate floors at the end of the day are water resistant, not waterproof. You don’t have to worry about the occasional spill on your laminate floors, but you do need to keep it away from excessive moisture. This means that you shouldn’t use cleaning items such as a steam mop as the combination of heat and humidity can cause the laminate to curl and lift, especially when done consistently.
Cleaning laminate floors is best done with a microfiber mop; it will effectively lift dirt and debris without scratching the laminate and, at most, will be damp.
To pair with the right mop, the best laminate floor cleaner is a dedicated laminate floor cleaner or a DIY solution of vinegar, water, and dish soap. Spray your cleaning solution on the mop instead of directly on the floor. Lastly, avoid using cleaning solutions with oil; definitely don’t use wax and polishes.
Amidst all the do’s and don’ts for cleaning laminate floors, remember to avoid excessive moisture and use gentle yet effective material to clean it. A fantastic resource to check how to best clean your laminate floors, specifically, is the brand you bought the floors from.
Can You Paint Laminate Flooring?
Yes, you can paint laminate floors.
Before deciding to paint, it’s best to double-check with the brand of your laminate flooring, as some brands will recommend not to paint over it. That said, most laminate floors can be painted, but the trick to success is in the preparation and finishing to make the job last and look professional.
You need to start with clean and leveled laminate flooring for laminate floor painting. Next and crucial step is to prime the floors with a high-quality oil-based primer. Once the primer is set, paint your floors with floor paint (floor paint is designed to be more durable to scratches), then lastly, seal with a high-quality sealant to finish things off.
Painting your laminate floors may be an affordable home renovation project, but you shouldn’t skimp on the primer, paint, and sealant, as these will determine how well done your painted floors will look and how long the paint job will last.
How to fix scratches on Laminate?
Laminate flooring, although durable, isn’t immune to scrapes and scratches. Check with the supplier of your laminate floors, as many will have a dedicated repair kit to address scratches adequately.
Laminate floor scratches can’t be corrected by sanding down as this will ruin the look of the panel or tile. Instead, scrapes and scratches are addressed with wax or putty that comes in the form of wax pencils, colored putty (specific to your flooring or a mix-and-match kit), and a putty knife.
For small scratches, fill it with a wax pencil matching the color of your laminate floors. For scrapes, use colored putty and a putty knife, and apply it from a 45-degree angle until the scrape is filled completely and seamlessly. Give the putty a day to set.
If you’re dealing with deep scrapes and scratches, your best option is to replace the floor panel altogether.
How To Remove Water Spots From Laminate Flooring?
Water spots on laminate flooring can be removed by putting a baking soda paste on the affected area and wiping it down with a microfiber cloth. For thicker water spots, such as a hard white layer from mineral water, you can use a heat gun to gently melt the hard water stain before wiping it off. Be sure to use the heat gun on the lowest setting and to not overheat the floor to prevent warping.
How To Remove Laminate Flooring?
Removing laminate floors is just about as easy as installing them. You don’t have to worry about undertaking a renovation obstacle course when removing laminate flooring, as you’ll be systematically prying out the layers.
Built to last you at least 15 years, in the event you want or need to replace laminate flooring, the first step is knowing what type of laminate flooring you’re dealing with. You need to know how it was put on to make the process of taking it out quickly, efficiently, and without damage, so it can be reused.
The types of laminate flooring you could be dealing with are either glued or snapped together. Glued panels, however, can’t be reused anymore, so you don’t have to be as delicate with them during the removal process as opposed to dealing with more modern snap-together laminate flooring.
Once you know what type of laminate floors you’re dealing with, set up equipment for prying out the panels and protective gear.
Don’t skip the protective equipment. You’ll need protective eyewear, heavy-duty work gloves, and work boots to protect you from flying chips and handling the panels, which have the potential to cut you if you’re not careful.
When removing panels, remove the baseboards from the walls by slicing through the bonding with a utility knife. Next, slide it between the wall and baseboard using a drywall knife, then pry the panels out with a flat bar.
After removing the baseboards, proceed to any present transition strips and gently pry them out with the ‘J’ portion of your flat bar. Be extra gentle when removing these transition strips for reuse.
Lastly, it’s time for the laminate flooring itself. Start with the first row. Pry them out using the ‘J’ end of your flat bar between your first row of planks and the wall. If you’re prying out glued panels, pry them out and pull it back with gloved hands until the panel breaks off. If you’re prying out snap-together laminate flooring, bend them upwards. Bend in accordance to the adjacent flooring to ensure clean removal.
When your first row is removed, you can use a chisel to lift the inner panels up until you’ve lifted all of the flooring.
If you no longer have use for the underlayment, or if the underlayment got damaged during the removal process, remove it and any residue with a floor scraper and heat gun if necessary.
After you’ve vacuumed any debris and cleaned up the subfloor, your space is ready for any new floor you’d want to install next!
How To Seal Laminate Flooring?
Sealing laminate flooring, or making it waterproof can be done by adding on to its top layer, taking it from becoming water resistant to water proof. This is a step worth doing especially if you live in a humid area or an area that seasonally goes through temperature changes. Winter especially is a time laminate flooring is prone to contracting and curling due to the added exposure to cold and moisture.
You can use caulk to address and seal expansion gaps, silicone to prevent damage or fully cover the entire area of your laminate flooring with polyurethane. You can opt for any of these materials to create a waterproof layer on your laminate flooring.
To know that the best option is for sealing your floors, consult with professionals or those who supplied you with your floors.
Making Your Laminate Flooring Last
Laminate flooring is inherently designed to last you years even in the face of foot traffic that comes with everyday life. But knowing how to properly install your floors, clean them and maintain them can give it that much extra boost in its lifespan so you can enjoy this beautiful and affordable flooring for as long as possible.
How to Fix Laminate Flooring Gaps?
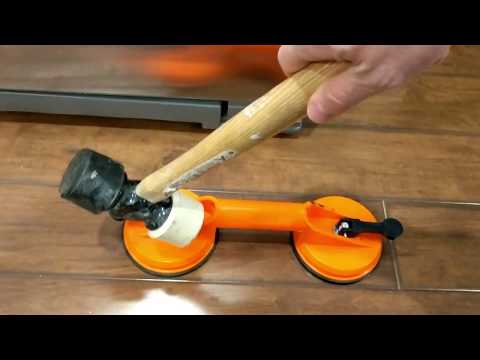
Even properly installed laminate flooring can experience gaps. This typically happens when temperatures drop and the floor panels contract. Use a glass suction cup and a dead blow hammer to address gaps.
You’ll first want to ensure your flooring and the gap in your flooring are clean and free of debris if you want your panels to be placed back well. Once clean, stick a glass suction cup within the flooring and line it up with the edge of the laminate flooring you want to put back into place. Once in place, from a 45 degree angle, use a dead blow hammer to tap it towards the direction of the gap until you’ve closed it.
Move on to the next panel and repeat the process. You’ll find the final gap underneath the baseboard when you reach the wall, which you don’t need to worry about as it won’t be visible.
Watch the video to learn to how to fix laminate flooring gaps: